If using Conda environment we STRONGLY recommend utilizing the conda package directly as a self contained option unrelated to the OpenSim application/GUI. It is the only supported mechanism for versions other than python 3.8. If using Conda please disregard installation instructions on this page and follow the link here https://anaconda.org/opensim-org/opensim

As of 12/2023, python 3.7 is past end of life thus all instructions specific to versions before OpenSim 4.3 (first version built against python 3.8) are moved to a separate section (old OpenSim/Python combinations) near the bottom of this page, we recommend upgrading to the latest version available if starting to use the OpenSim API from python.


Introduction to Python

Python is a widely used general purpose programming language. Python is free and open source, with a large user community that encourages sharing and user contributions. The Python language is very flexible, supporting object-oriented and procedural styles of computing. The Python design philosophy also emphasizes code readability which makes sharing and using code easier than with some other languages. 

Those from scientific and engineering backgrounds who are new to Python should check out the following resources to help get started with the language:

Note on Python versions

  • The Python package that comes with the OpenSim GUI distribution is built for a specific python version (OpenSim version 4.3+ distributions bindings were built against python 3.8 exclusively). Users should try to use the Conda packages mentioned above for all variants of python, and let us know if additional variants are needed.  If not possible to use Conda, users can follow the installation instructions below (will only work if using the same python version as in the table below) or build the python bindings using their preferred python version from source repository.
  • OpenSim versions and the corresponding python versions used to build distributions: 

    OpenSim versionPython versionAvailable conda packages
    4.33.8-
    4.4, 4.4.13.83.7, 3.8, 3.9, 3.10, 3.11
    4.53.83.9, 3.10, 3.11

Setting up your Python scripting environment (if not using conda)

Windows

There are a couple options for setting up Python on your Windows machine. You will need the main Python package, as well as NumPy. Alternatively, there are applications such as Anaconda that bundle all the required packages. You can also just set-up Python and the associated packages manually. We have tested both methods, but currently advise you to use Anaconda. Make sure that you get 64-bit Python.


Package NameDownloadsCosts/licensing
AnacondaBasic package is free to download and use, contains Python and other dependent packages. Cleanly installs into a single directory on your machine. Automatically picks a version of OpenSim/Python that works out of the box.
Python 3.8+PythonFree to use and download.

Manual installation from OpenSim GUI distribution, not using Anaconda:

If not using Anaconda, please proceed to the following section, only execute steps 1, 9-12 below. Note however that you'll need to install numpy on your own.

Using Anaconda with OpenSim 4.3+ and conda  .yml file 

  1. If paths to previous OpenSim versions exist on your PYTHONPATH environment variable, remove them. (If you used OpenSim 4.2 with Python, this step is likely necessary.)
  2. Download Anaconda. (If not done already)
  3. Download the Anaconda environment file (conda_env.yml) and place it directory of your choice; perhaps <RESOURCES_DIR>\Code\Python. This environment includes the following packages:
    1. Python 3.8
    2. NumPy 1.20.2
    3. Matplotlib
    4. Spyder (Python IDE)
  4. Open the Anaconda Prompt.
  5. Before proceeding, you may need to initialize conda for shell interaction by running (If not done already)

    C:\> conda init <shell-name>

    where <shell-name> is one of the following: cmd.exe (Windows default) or powershell.

  6. Navigate to the location of the Anaconda environment file. For example, if using cmd.exe:

    C:\> cd "C:\Users\<profile>\Documents\OpenSim\4.3\Code\Python"
  7. Create the environment from the file:

    C:\> conda env create -f conda_env.yml
  8. Deactivate any existing environments and activate the OpenSim scripting environment. The prefix "opensim_scripting" should now appear in the Anaconda Prompt.

    (base) C:\> conda deactivate
    C:\> conda activate opensim_scripting
    (opensim_scripting) C:\>
  9. Navigate to folder sdk\Python in the OpenSim 4.3 installation; perhaps C:\OpenSim 4.3\sdk\Python.
  10. First, run the following script:

    (opensim_scripting) C:\> python setup_win_python38.py
  11. Install OpenSim by running

    (opensim_scripting) C:\> python -m pip install .
  12. Once installation completes, test the configuration by checking the timestamp from running 

    (opensim_scripting) C:\> python
    >>> import opensim as osim
    >>> osim.GetVersionAndDate()
    >>> quit()

    in the Anaconda Prompt. Test that the visualizer is working by running the following

    (opensim_scripting) C:\> cd "C:\Users\<PROFILE_NAME_HERE>\Documents\OpenSim\4.3\Code\Python\Moco"
    (opensim_scripting) C:\> python exampleSlidingMass.py

    You should see a visualizer window appear with a sliding mass animation. Hit ESC twice to close the window. If you get an error about loading DLL failure check that PATH has been updated correctly before relaunching the shell.

  13. Scripting can be performed by using a text editor and running the scripts from the Anaconda Prompt via "python <script_name>.py". However, if you prefer using an interactive development environment (IDE) similar to Matlab, we've included the Spyder IDE in the Anaconda environment. Launch Spyder by simply running

    (opensim_scripting) C:\> spyder

Having trouble?


If you are having trouble with getting python wrapping to work on Windows, the issue is almost certainly one of the following:

  1. You are trying to use 32-bit Python with 64-bit OpenSim libraries. If you are using 64-bit OpenSim libraries, make sure to use 64-bit python.
  2. OpenSim's DLLs are not on your PATH. In a command window, you could achieve this with a command like "set PATH=C:\OpenSim 4.0\bin;%PATH%"

Mac

There are 2 possible architectures on OSX: arm64 and intel x86_64. There're conda packages for both, however the GUI distribution includes ONLY x86_64 build with Python 3.8. MacOS comes with some version of Python, but you may also want to obtain Python through Homebrew or the Anaconda Python distribution. Note that the Python package that comes with the OpenSim GUI distribution was built to use the Python that comes with macOS, and it will not work with Homebrew's Python or with Anaconda Python; in the latter cases, you must compile OpenSim from the source code.

Navigate to the location of the opensim python package within the OpenSim installation. If you are using OpenSim's GUI distribution, this location is likely /Applications/OpenSim 4.x/sdk/Python. If you built OpenSim from source, this location is likely OPENSIM_INSTALL_DIR>/lib/python3.x/site-packages if using Python ). Perform the following (modifying the path below if necessary):

$ cd /Applications/OpenSim 4.0/sdk/Python
$ sudo python setup.py install

The OpenSim libraries must be on your DYLD_LIBRARY_PATH:

$ export DYLD_LIBRARY_PATH=$DYLD_LIBRARY_PATH:<OPENSIM_INSTALL_DIR>/lib

You can place the above `export` commands in your `~/.bash_profile` file so that they are set whenever you open up a new terminal.

You should be ready to use the Python wrapping now. Try the following from any directory:

$ python
...
>>> import opensim
>>> m = opensim.Model()

Step-by-step instructions when using Anaconda with OpenSim 4.3+

  1. If paths to previous OpenSim versions exist on your PYTHONPATH environment variable, remove them. (If you used OpenSim 4.2 with Python, this step is likely necessary.)
  2. Download Anaconda.
  3. Download the Anaconda environment file (conda_env.yml) and place it directory of your choice; perhaps <RESOURCES_DIR>/Code/Python. This environment includes the following packages:
    1. Python 3.8
    2. NumPy 1.20.2
    3. Matplotlib
    4. Spyder (Python IDE)
  4. Open the terminal.
  5. Before proceeding, you may need to initialize conda for shell interaction by running

    $ conda init <shell-name>

    where <shell-name> is one of the following: bash (macOS default), fish, zsh, tcsh, or xonsh.

  6. Navigate to the location of the Anaconda environment file:

    $ cd /Users/<profile>/Documents/OpenSim/4.3/Code/Python
  7. Create the environment from the file:

    $ conda env create -f conda_env.yml
  8. Deactivate any existing environments and activate the OpenSim scripting environment. The prefix "opensim_scripting" should now appear in the terminal (it may appear on the right side of the screen).

    (base) $ conda deactivate 
    $ conda activate opensim_scripting
    (opensim_scripting) $
  9. Navigate to folder sdk/Python in the OpenSim 4.3 installation; perhaps /Applications/OpenSim 4.3.
  10. Install OpenSim by running

    (opensim_scripting) $ python -m pip install .
  11. You may need to update the DYLD_LIBRARY_PATH to include the OpenSim and Simbody libraries:

    (opensim_scripting) $ export DYLD_LIBRARY_PATH="$DYLD_LIBRARY_PATH:<YOUR_INSTALL_DIRECTORY_HERE>/sdk/lib" 
    (opensim_scripting) $ export DYLD_LIBRARY_PATH="$DYLD_LIBRARY_PATH:<YOUR_INSTALL_DIRECTORY_HERE>/sdk/Simbody/lib"
  12. Once installation completes, test the configuration by checking the timestamp from running 

    (opensim_scripting) $ python
    >>> import opensim as osim
    >>> osim.GetVersionAndDate()
    >>> quit()

    in the terminal. Test that the visualizer is working by running the following

    (opensim_scripting) $ cd "/Users/<PROFILE_NAME_HERE>/Documents/OpenSim/4.3/Code/Python/Moco"
    (opensim_scripting) $ python exampleSlidingMass.py

    You should see a visualizer window appear with a sliding mass animation. Hit ESC twice to close the window. If you get an error about loading DLL failure check that PATH has been updated correctly before relaunching the shell.

  13. Scripting can be performed by using a text editor and running the scripts from the Anaconda Prompt via "python <script_name>.py". However, if you prefer using an interactive development environment (IDE) similar to Matlab, we've included the Spyder IDE in the Anaconda environment. Launch Spyder by simply running

    (opensim_scripting) $ spyder

Ubuntu

We assume that you will use Python through the terminal. Open a new terminal window.

$ sudo apt-get install python-setuptools

Navigate to the sdk/python folder in your OpenSim installation. Assuming that OpenSim is installed into directory OPENSIM_INSTALL_DIR (by executing make install), perform the following:

$ cd <OPENSIM_INSTALL_DIR>/lib/python3.x/site-packages
$ sudo python setup.py install

The OpenSim libraries must be on your LD_LIBRARY_PATH:

$ export LD_LIBRARY_PATH=$LD_LIBRARY_PATH:<OPENSIM_INSTALL_DIR>/lib

You can place the above `export` commands in your `~/.bashrc` file so that they are set whenever you open up a new terminal.

You should be ready to use the Python wrapping now. Try the following from any directory:

$ python
...
>>> import opensim
>>> m = opensim.Model()

Old OpenSim/Python combinations

Windows:

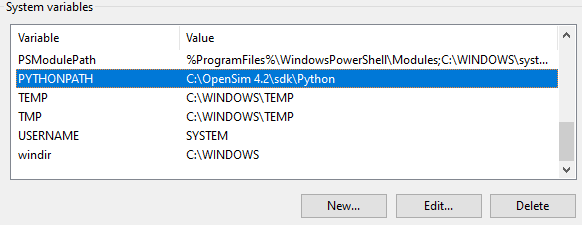
Add a folder to PYTHONPATH variable (needed for OpenSim 4.2)

Insert OpenSim Python directory into PYTHONPATH

Edit your PYTHONPATH environment variable to include <OPENSIM_INSTALL_DIRECTORY>\sdk\Python is in system variable PYTHONPATH, where OPENSIM_INSTALL_DIRECTORY is the directory where you installed the current version of OpenSim (e.g. C:\OpenSim 4.0). Delete any other OpenSim Path entries. If PYTHONPATH doesn't exit, you can add the variable using the "New..." button. For instructions, see https://www.java.com/en/download/help/path.xml


Mac:

Needed for OpenSim 4.2: You must also add OpenSim's python folder to PYTHONPATH, also by adding the following to the `~/.bashrc` file:

export PYTHONPATH=<OPENSIM_INSTALL_DIR>/sdk/Python:$PYTHONPATH

Ubuntu:

Needed for OpenSim 4.2: You must also add OpenSim's python folder to PYTHONPATH, also by adding the following to the `~/.bashrc` file:

export PYTHONPATH=<OPENSIM_INSTALL_DIR>/sdk/Python:$PYTHONPATH


Available Example Scripts

Scripts can are located in the OpenSim distribution in the sdk/Scripts/Python folder. 

Script Name

Description
build_simple_arm_model.pyThis script generates a simple arm model, runs a simulation, and visualizes the results.
wiring_inputs_and_outputs_with_TableReporter.pyThis script shows how to write model outputs (the position of a body) to a data file.

Pythonic extensions of the OpenSim API

We have add some pythonic aspects to our Python interface. All examples assume that you have already imported the opensim package ("import opensim").

Initializing a Vector from a Python list
v = opensim.Vector([6, 7, 8, 9])
rv = opensim.RowVector([1, 2, 5])
Accessing elements of VecX and Vector using brackets
v = opensim.Vec3(1, 2, 3)
v[0] = 1.5 + v[1]
w = opensim.Vector(5, 1.5)
w[0] = 3 * w[1]
Printing the contents of a VecX or Vector
>>> v = opensim.Vec3(1, 2, 3)
>>> print v
~[1,2,3]
Getting the length of a VecX or Vector

You can use the built-in python function len() on VecX (e.g., Vec3) and Vector:

w = opensim.Vector(5)
if len(w) < 5:
    raise Exception()
Iterate over elements of any Set

There are two iterators: one that treats the Set like a python list, and another that treats the Set like a python dict:

model = opensim.Model("my_model.osim")
for force in model.getForceSet():
    print(force.getName())
for name, muscle in model.getMuscles():
    print(name, muscle.get_max_isometric_force())

Iterate over all bodies in a model (even bodies not in the model's BodySet)

model = opensim.Model("my_model.osim")
for body in model.getBodyList():
    print(body.getName())